How to fix a blurry picture without spoiling

How to fix a blurry picture without spoiling the whole photo? It is a question that must be answered. Sometimes you take a really good picture and you surely don’t want to delete it just it isn’t sharp enough because for some reason. So we are going to discuss why does it happens and how to safe blurred photos. Still, there are photo restoration services that eager to help you to do it.
Fixing in Photoshop blurry picture is not that hard, but you still need to figure out how to do it. So we try to help you in it.

Four Kinds Of Blur
If you hear something like “The picture is blurry”, what kind of blur do you think of? Because there are four kinds of blur and the way of editing such picture probably depends on which type you have at that moment. So, to know how to fix a blurry photo we need to understand what kind of blur we work with.
So, there are four following types:
- Moving Camera
When taking a photo of moving object, then you will for sure receive a blurry photo. The only exception is shooting in this style on purpose.

Then you need an action camera to be able to capture moving objects without losing sharpness. The best action camera according to the opinion of many professional photographers is GoPro Hero 4 Black. This model provides better 4K quality then almost all other action cameras. Going back to the problem of blurriness, to answer the question “How to fix a blurry photo resulted from camera movement?”, firstly we need to learn about the second type of it, as the first and the second one require a similar way out.
- Subject movement
In this case, you get a background or another static part of a photo sharp, while moving subjects are completely blurred.
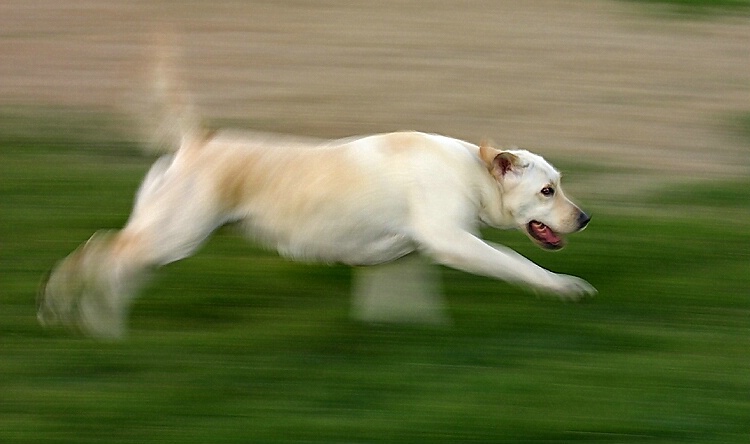
Just like in first situation, it can be done deliberately, as artistic way to show something important or vice versa in the picture. However, let’s go back to undesirable blur.
How To Fix A Blurry Picture of Motion-Based
Here is a step-by-step instruction of how to fix a blurry picture. Also, it can be useful for you to know How to repair photographs in 10 steps so check it out!
Make a Copy Of Photo You Need and Open It
Obviously, as a first step, you need to open the picture in Photoshop. It is necessary to work with a copy, not original!
Make a Copy of the Layer Of the Background
Just like you copy your image, you also need to copy the background of the photo. Click on right button on the background layer on the palette of layers.
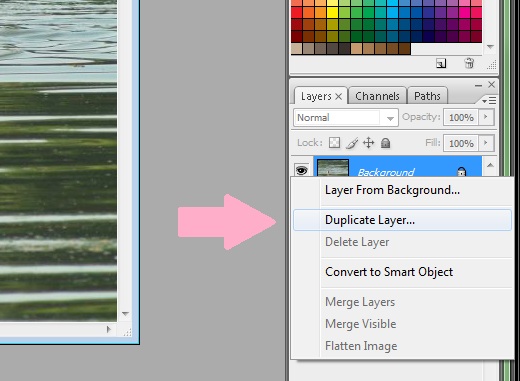
Then click "Duplicate Layer" from the menu appeared menu. Do not fix in Photoshop blurry picture without doing it.
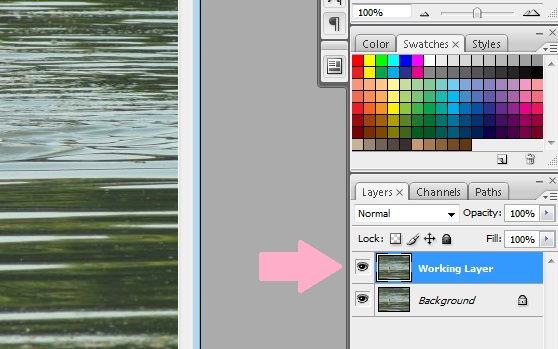
Give the Layer Another Name
It will be automatically named as "Background copy" by Photoshop, but you can rename it as anything else. Let’s call it “Work Copy” as we will work with this one.

You’d better not to name your layers as some silly or just random things. You will probably be confused when you get to edits that are more complicated then to fix blurry photo in Photoshop as it may be more than dozens of layers.
To create a new layer, click “OK”.
A Few Words About Layers
Since this moment, all changes will be reflected on the layer. Imagine that these layers are the films on your photo, some covers on which you can draw whatever you want. If something goes wrong, you can always remove it and nothing will happen with the photo. Or you can remove the top layer and go back to the previous one.
To fix blurry photo in Photoshop correctly, watch carefully which layer is highlighted as you need to know with which one you work.
To look at the original image ( actually, a copy, but in this case we will call it the original one), if you need to compare processed image and the original and so on, click on the eyeball icon that I situated next to each layer.
Usage of layer mask
To add a layer mask you need to click on the square with a hole (find it on bottom of the palette).
Manipulation of layer masks
A mask is a kind of black and white image, containing black color, white and gray )as well as its shades). White color shows (100% opacity), black color - masks (100% transparency), and gray color - is designed to create a different degree of transparency. Thus, you can play with these colors to get an effect with a sharp or smooth transition. There are another possible way how to fix a blurry photo without using a mask but this way is more than effective.
Fixing blurry picture because of the motion
Well, you need to blur the whole layer, and then portions of the mask we do not need. After that, Smart Sharpen is need to be applied.
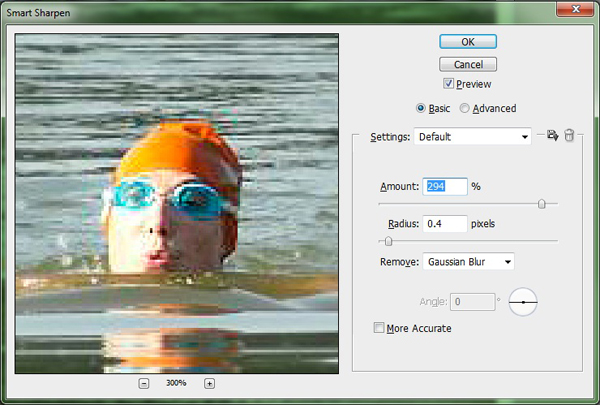
Here is an example of the settings, which is the best in this case.

How to Mask off the Portions That Are Unblurred
Okay, now you know how to fix a blurry photo but what to do with the other part of a photo? As this editing changed all unblurred parts to the worse, we need to mask layer. So, you need to pick the mask, and paint gray or black or whatever color you want (as a color isn’t put on your photo) over every place you do not want the effect of Smart Sharpen employ to.
Now, let’s look through the last two types of blur and how to fix a blurry picture in Photoshop in these cases.
- Focus problem
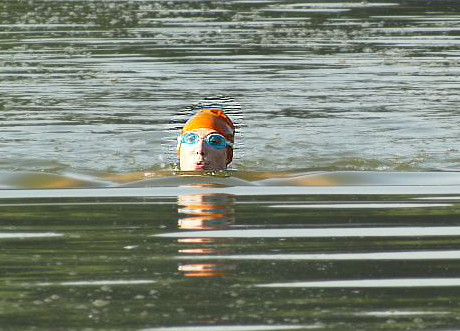
The problem is that a camera focuses on the background of the picture or something else instead of the main subject of a photo. For example, look at the picture below.

Here we see that a subject that is out of focus is rather soft.
- Diffraction
There are a few reasons of it. The first one are cheap lenses (because of their poor quality). The second one is any type of dirt or oil on your lens. And the last reason is about technical side of the problem. The light has to deform hard to go through the aperture.
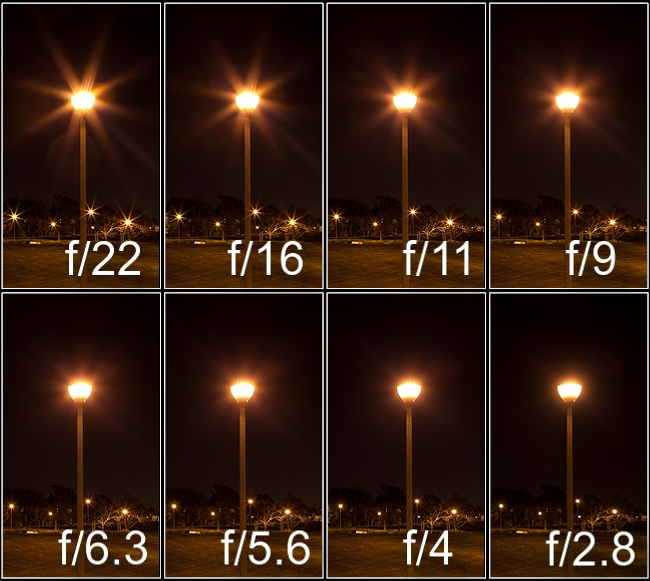
If it is stopped down to very high degree (f 22) then the photo gets soft rather than sharp. So, how to fix blurry photo in Photoshop of this type?
How to fix a blurry picture in Photoshop If the blur is Not Based On Motion
First four steps are the same for all types. What you do next is:
It’s time for the Lasso Tool
Our next move in Photoshop blurry fixing is using the lasso. It separate the part you want to fix from the whole picture. If needed field is different from surrounding objects so you can easily distinguish it, use the magnetic lasso tool.
If the part you need to select has straight lines, that is, if it is one of geometric figure, then use the polygonal lasso.
Feather Selected Part’s Borders
How you fix a blurry picture without making a picture looks unnatural?
Click Select, then Modify and Feather.
You definitely need to do this, because even though you do not see that the selected outline has become more indistinct, but it will be seen as soon as we move to editing.
Using Feathering
Without it the fixed area will distinguished way too much as you can see in the picture below.
There is no straight rule of using this tool but the golden mean is three to five pixels.
Sharp Smart
There is much more than only one way to fix blurry photo in Photoshop. Eventually, it’s what Photoshop about, you can try many different ways to fix a problem and then decide which one is the best for you.
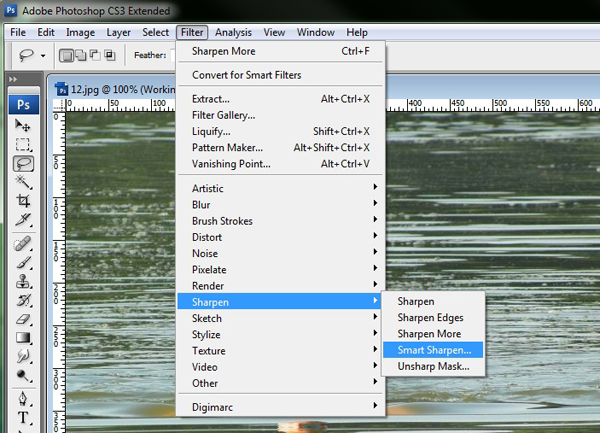
So, one of the possible way for you to fix blurry photo in Photoshop program is to do next:
Click Filter, then Sharpen and, finally, Smart Sharpen.
Finish the Sharpening
When you have selected the radius, back off on the "Amount”, stop only when the effect looks the most realistic way.
To check the quality of the editing zoom the preview. Pay attention to the small details, because it is for them to see whether sharpness worked well.
Check it twice
If you are dissatisfied with your work after a preview, then cancel the last operations and go back to step seven. Remember that in Photoshop blurry pictures can be fixed completely, so do not be lazy. Quality is above all! If the result is completely fine with you, click OK to save the changes.
Carefully look at the photo before, and after its editing.
It is superfluous to make sharpness too hard, as it is important to keep the natural look of the photo.
For instant, look at the photo restoration samples.
Our editing service safes the natural look of a photo even after such damages.
How to Flatten A Photo
So, you think this is the end? Not exactly. To finish to fix blurry photo in Photoshop, you are to flatter your picture. We call combination of two and more layers as Flattening. Why? Because both JPG format and PNG format are multipurpose. These two are the most common as well.
Flatter the picture by clicking right on any layer. But it's important to know that some types of layers do not allow you the option of flattening.
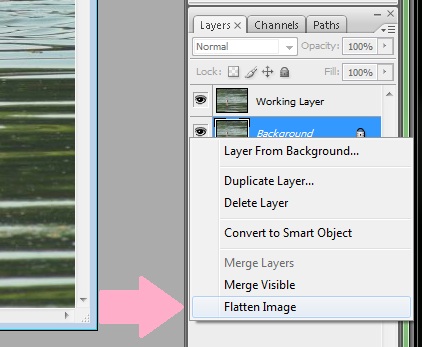
In the appeared menu, choose "Flatten the photo".
It’s the final step of our instruction of how to fix a blurry picture in Photoshop. After it you need to just safe the file in needed folder.
Hard work is done. Do you want to know how much such services cost?
You will find it at photo restoration prices.
So, there are a lot of ways and some of them might seem rather difficult. Hope this article helps you to understand how everything works.
Still, our editing service is always ready to help so you don’t need to look for an answer to the question “How to fix a blurry picture in Photoshop”. We know how to deal with clients and in the article Dealing with angry customers – photographers must know some tricks you will find our secrets.
Tell you friends about this article!

Would you rate the article?
The article has a rating of:
|
| Via Facebook: |
| Via Disqus: |